| JavaScript/Creating User Interface Objects | ||||||||||||||||||||||
Creating User Interface ObjectsCreating a WindowYou can create a window by calling:
    include("oops/r3window.js");

    win = new r3Window(R3WGA_Parent, r3MainWindow);

    win.REALIZE();
This creates an empty window with default size, position and other attributes.
The first call.
include("oops/r3window.js");
loads in JavaScript interface to Realsoft 3D Window objects, if not already loaded. The second call:
win = new r3Window(R3WGA_Parent, r3MainWindow);
creates a window object. Parameters for the construction function specify properties for the window to be created. Each property is defined by a tag-value pair. For example:
R3WGA_Parent, r3MainWindow
defines the parent window. All properties for the r3Window class can be found in 'scripts/js/oops/r3window.js header file, or one of the files from which the r3window object is derived. There are two ways for setting desired attributes: by passing them to the constructor function as a tag list, or by setting them by calling the appropriate Set method. For example, r3window.js defines attribute id 'R3WA_Title'. This attribute can be set by calling the 'SetTitle' function (just replace the 'R3WA_' prefix with 'Set' to get the name of the function.
    include("oops/r3window.js");

    win = new r3Window(R3WGA_Parent, r3MainWindow);
    win.SetTitle("My Window");

    win.REALIZE();
Another way to create a window with desired title is by passing the attribute id, with associated value to the constructor function:
    include("oops/r3window.js");

    win = new r3Window(R3WGA_Parent, r3MainWindow
                       R3WA_Title, "My Window");
    win.REALIZE();
Note: Realsoft3D defines variable 'r3MainWindow'. This variable refers to the Realsoft 3D main window. The R3WGA_Parent tag must always be given to the constructor function because it is not possible to create a window without specifying the parent for it. This is true of all other user interface specific objects, such as sliders and buttons, to name a few. The third call:
win.REALIZE();
makes the window visible to the user. You have to call this method whenever you create a new window object. This is also true for all objects derived from the r3Window object. Geometric ManagersRealsoft 3D provides you with an advanced toolset for designing user interfaces. The system uses geometric managers to take care of managing layouts. By letting geometric managers to do the job has many advantages. For example, your layouts will work on any platform. Also, the more complex interfaces you design, the easier it will be to maintain them using geometric managers. Geometric managers allow you to create truly reusable user interface code. You will be able to change gadget texts, icon sizes, insert new controls into your windows etc. and the layout is automatically updated for you. Packer geometry manager allows us to design horizontal and vertical layouts i.e. align controls horizontally or vertically. This is the most often needed geometry manager. To create a packer:
    include("oops/r3packer.js");

    packer = new r3Packer(R3PA_Orientation, R3PAOF_HORIZONTAL);
Then you can ask the window to use the created geometry manager by calling:
win.SetGmanager(packer);
Anything you insert into this geometry manager gets automatically aligned. Just like the r3Window class, geometric managers are also derived from the widget base class. However, geometric managers do not have any visible geometric properties. Creating GadgetsProperties for the button object are defined in the 'oops/r3button.js' header file. You can create a button by calling:
    include("oops/r3button.js");

    myButton = new r3Button(R3WGA_Parent, myWindow,
                            R3GA_Text, "My Button",
                            R3GA_ToolTip, "Click this button");
Note: Just like with windows, you must specify the parent window for the button using the R3WGA_Parent tag. In fact, all user interface objects require that you pass the parent object to the constructor function. The underlying operating system is not able to create the control if no parent is specified. Below you can find some examples for creating other commonly needed controls.
    include("oops/r3checkb.js");

    gad = new r3Checkbox(R3WGA_Parent, myWindow,
                         R3GA_Text, "A checkbox",
                         R3GCBA_Checked, TRUE);


    include("oops/r3cycle.js");

    gad =  new r3Cycle(R3WGA_Parent, window,
                       R3GA_Text, "Quality",
                       R3MXILTGA_Labels, ["Preview", "Medium", "Good", "Best"],
                       R3GA_ToolTip, "Select desired rendering quality");


    include("oops/r3radiob.js");

    gad = new r3Radiobutton(R3WGA_Parent, window,
                            R3GRBA_Labels, ["Circle", "Rectangle", "Triangle"]);


    include("oops/r3slider.js");

    slider =  new r3Slider(R3WGA_Parent, window,
                           R3GA_Text, "Level of detail",
                           R3GSLA_Min, 0,       // minimum level
                           R3GSLA_Max, 100,     // maximum level
                           R3GSLA_Level, 20);   // current level
Making Objects talk to an ApplicationIf we executed the above code, it would create a dummy button object. Clicking the button would do nothing. For all practical applications, we need to make GUI objects to talk to us so that we can link functionality to our user interface. This can be done through callback functions. Let's imagine we want to implement a close button i.e. when the user clicks any of the buttons, the entire application is shut down. To do this, we define a callback function which calls r3Exit() function:
    function myhook(window, event, value)
    {
        r3Exit();
    }
Then we pass this function to the button constructor by using the R3RA_Hook tag.
    button = new r3Button(R3RA_Hook, myhook,
                          R3WGA_Parent, window,
                          R3GA_Text, "My button");
Whenever the user clicks the above button, the 'myhook' function gets called, which shuts down the program. You can use callbacks with all the basic Realsoft 3D GUI objects, such as slider gadgets, string gadgets, windows, just to name a few. Putting it all togetherNow that we know how to create windows, packers and buttons, let us create a window with horizontally aligned buttons.
    include("oops/r3button.js");
    include("oops/r3window.js");
    include("oops/r3packer.js");

    function myhook(window, event, value)
    {
        r3Exit();
        return 1;
    }

    window = new r3Window(R3WGA_Parent, r3MainWindow,
                          R3WA_Title, "My Window",
                          R3WA_ReportCloseWindow, TRUE,
                          R3WA_ReportNewSize, TRUE);

    packer = new r3Packer(R3PA_Orientation, R3PAOF_HORIZONTAL);
    window.SetGmanager(packer);

    for(i = 0; i < 5; i++) {
        button = new r3Button(R3RA_Hook, myhook,
                              R3WGA_Parent, window,
                              R3GA_Text, "Exit " + i);
        packer.ADD(R3PAPF_EXPAND | R3PAPF_FILLX | R3PAPF_FILLY, 0, button);
    }

    window.FIT(R3WFP_BESTFIT);
    window.REALIZE();
This creates the following window:
In the 'for' loop, the program creates five button objects and inserts them into the packer by calling the 'ADD' method. The parameters for this method specify how the packer will manage the control in question. R3PAPF_EXPAND asks the object in question to request as much space as possible from the packer. If there are multiple controls defining expand option, the packer will distribute the space evenly to all requesters. The R3PAPF_FILLX and R3PAPF_FILLY flags then control whether the object should fill the given screen space horizontally, vertically or both. If you only specify R3PAPF_EXPAND, but you do not specify R3PAPF_FILL options, the buttons will be distributed over the entire window (i.e. the packer will distribute them more space) but the buttons will not be stretched to fill the extra screen space. The program also calls the FIT method. By passing the R3WFP_BESTFIT parameter to this method, we ask the window to compute the size needed to make all the created sub controls to fit into the window. The size needed depends on the current font, operating system, and many other properties. You can find the above sample program from: scripting/intro/ Creating more Complex LayoutsEach window can have only one geometric manager associated with it. However, geometric managers can be grouped hierarchically to construct more complex layouts. For example, we can create a tool bar window consisting of two rows of tools by making the top level packer vertical and then creating two horizontal sub packers for it. The actual tool buttons are then inserted into these sub packers.
And here is the code:
    // create the top level packer
    top = new r3Packer(R3PA_Orientation, R3PAOF_VERTICAL);

    // create two sub packers
    sub1 = new r3Packer(R3PA_Orientation, R3PAOF_HORIZONTAL);
    sub2 = new r3Packer(R3PA_Orientation, R3PAOF_HORIZONTAL);

    // and insert the sub packers into the top level packer.
    top.ADD(R3PAPF_EXPAND | R3PAPF_FILLX | R3PAPF_FILLY, 0, sub1);
    top.ADD(R3PAPF_EXPAND | R3PAPF_FILLX | R3PAPF_FILLY, 0, sub2);
Then we create and insert desired controls into the sub1 and sub2 packers.
    // create buttons for the first sub packer
    for(i = 0; i < 5; i++) {
        button = new r3Button(R3RA_Hook, myhook,
                              R3WGA_Parent, window,
                              R3GA_Text, "Exit " + i);
        sub1.ADD(R3PAPF_EXPAND | R3PAPF_FILLX | R3PAPF_FILLY, 0, button);
    }

    // buttons for the second sub packer
    for(i = 0; i < 4; i++) {
        button = new r3Button(R3RA_Hook, myhook,
                              R3WGA_Parent, window,
                              R3GA_Text, "2nd row " + i);
        sub1.ADD(R3PAPF_EXPAND | R3PAPF_FILLX | R3PAPF_FILLY, 0, button);
    }
The geometric manager hierarchy can be as deep as you like, providing you with total control over layouts. AnchoringIn the previous chapters we demonstrated the usage of pack flags (R3PAPF_EXPAND, R3PAPF_FILLX and R3PAPF_FILLY).The second parameter for the ADD() method specifies so called 'anchor' flags. Whereas R3PAPF_FILLX and R3PAPF_FILLY flags control the size, the Anchor flags control how the widget is positioned within the space it gets from the packer. Below you can find the list of available anchor codes.
Unlike pack options, these are mutually exclusive i.e. you can define only one of them. Because the anchor codes control how the object in question is managed within the space it gets from the packer, it usually makes sense to use these only with R3PAPF_EXPAND option. If you don't define EXPAND, the inserted control may not have a room to move anywhere. For example, if you insert a control to a packer by calling:
mypacker.ADD(R3PAPF_EXPAND, R3PAAF_CENTER, mybutton);
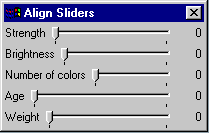
the inserted button will be centered within the space it gets from the geometry manager. Perhaps one of the most often needed anchor options is R3PAAF_ALIGN, so let's check this out in more detail. Let's create a window that consists of a number of vertically stacked sliders. The example looks pretty much the same as the first button example we created in the 'Putting it all together' chapter. The only difference is that we now use sliders instead of buttons and use vertical packing rather than horizontal packing. As usual, we need to include the slider's header file. By studying the header file we can find out the name of the constructor as well as the attributes the slider defines. That's all we need to know in order to create a slider. Here is the code:
    include("oops/r3slider.js");
    include("oops/r3window.js");
    include("oops/r3packer.js");

    window = new r3Window(R3WGA_Parent, r3MainWindow,
                          R3WA_Title, "Align Sliders",
                          R3WA_ReportCloseWindow, TRUE,
                          R3WA_ReportNewSize, TRUE);

    packer = new r3Packer(R3PA_Orientation, R3PAOF_VERTICAL);
    window.SetGmanager(packer);

    // create five sliders
    var sliderLabels = ["Strength", "Brightness", "Number of colors", "Age", "Weight"];

    for(i = 0; i < sliderLabels.length; i++) {
        slider = new r3Slider(R3WGA_Parent, cbWindow,
                              R3GA_Text, sliderLabels[i],
                              R3GSLA_Min, 0,
                              R3GSLA_Max, 100);
        packer.ADD(R3PAPF_EXPAND | R3PAPF_FILLX, 0, slider);
    }

    window.FIT(R3WFP_BESTFIT);
    window.REALIZE();
This creates the following window:
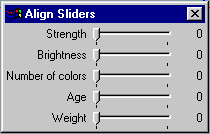
By inserting the sliders with the R3PAAF_ALIGN, we can align the sliders based on their 'alignment point'. Let's change the ADD method to:
packer.ADD(R3PAPF_EXPAND | R3PAPF_FILLX, R3PAAF_ALIGN, slider);
Run the script and the resulting window is as follows:
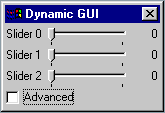
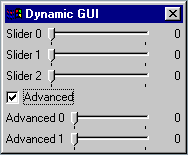
Creating Dynamic InterfacesWhen designing user interfaces, you should hide unnecessary complexity from the end user. For example, if you select a certain type of geometric object, your tool window can automatically show only those tools which can be applied to the selected objects.Geometric managers define the 'Stealth' attribute, which allows you to hide the controls associated with the geometric manager in question. Setting 'Stealth' to 'TRUE' makes all the managed controls invisible and collapses them to zero size. The effect is that the contents of the geometric manager can not be seen and do not require any screen space. We strongly encourage you to take advantage of this powerful feature so let's go through an example demonstrating this. Let us create a window which consists of a bunch of sliders. Let's imagine that some of these sliders should be shown only when the user clicks an 'Advanced' check box. This is really trivial to implement. The only thing we need to do is to put those advanced controls into a separate geometry manager, which we can then either show or hide easily. Here is the code creating the geometry managers and the sliders:
    // create a window and top level packer as usual
    window = ... [snip]
    packer = ...[snip]

    // insert couple of controls into the packer, as usual
    ... [snip]

    // create the 'Advanced' check box.
    checkb = new r3Checkbox(R3RA_Hook, showAdvanced,
                            R3WGA_Parent, window,
                            R3GA_Text, "Advanced");
    packer.ADD(R3PAPF_EXPAND | R3PAPF_FILLX | R3PAPF_FILLY, 0, checkb);

    // create and insert advanced controls into a separate packer.
    packAdvanced = new r3Packer(R3PA_Orientation, R3PAOF_VERTICAL);
    packer.ADD(R3PAPF_EXPAND | R3PAPF_FILLX, 0, packAdvanced);

    for(i = 0; i < 2; i++) {
        slider = new r3Slider(R3WGA_Parent, window,
                              R3GA_Text, "Advanced " + i);
        packAdvanced.ADD(R3PAPF_EXPAND | R3PAPF_FILLX, 0, slider);
    }

    // Let's hide the advanced controls by default
    packAdvanced.SetStealth(TRUE);

    // tell the check box where to find the 'advanced'packer and
    // the parent window so that check boxes callback can access them.
    checkb.packer = packAdvanced;
    checkb.window = window;

    // fit and realize, as usual
    [snip]
And here is the callback:
    function showAdvanced(gadget, event, checked)
    {
        if(checked)
            gadget.packer.SetStealth(FALSE);
        else
            gadget.packer.SetStealth(TRUE);
        gadget.window.FIT(R3WFP_BESTFIT);
    }
When the user checks the Advanced check box, the advanced packer is shown. When the user resets the check box, packer is hidden. Whenever the layout of a window is changed, we need to ask the window to update its layout by calling the FIT method.
| ||||||||||||||||||||||
